It’s an essential and very powerful file. In WordPress, the .htaccess file can help you strengthen your site’s security, set up redirects, or even improve your pages’ loading speed.
To reach its full potential, this valuable ally must be handled with the utmost care. Because if there is a syntax error in the code it contains, your website will crash.
To help you avoid that, this article will reveal everything about this file. By the end of your reading, you’ll know how to create, edit, and modify it thanks to our practical, illustrated tips.
Finally, you’ll have around fifteen configuration rules to copy and paste directly into your .htaccess file.
What is the WordPress .htaccess file?
Definition of .htaccess
A .htaccess file is a text file used by Apache web servers. It controls how a server works and runs, and allows you to modify its configuration at the directory level.
By adding directives to this file, you can notably strengthen your site’s security, improve its performance, set up redirects, etc.
Here are several things to know about the .htaccess file:
- Htaccess is short for hypertext access.
- One of the distinctive features of a .htaccess file (on WordPress or another CMS, Content Management System) lies in its syntax. It starts with a dot, like many files dedicated to configuration.
In IT jargon, these are also called dot files. Files containing a dot in their extension are often hidden (we’ll come back to this). - A .htaccess file is a configuration file for the Apache web server software. It will not be supported by all web servers. This will be the case with LiteSpeed, for example, but not with Nginx. If your WordPress site runs on Nginx, you will not have a .htaccess file.
- WordPress modifies the .htaccess file so it can manage the structure of your permalinks (the addresses of your website’s pages). In fact, the CMS takes the opportunity to create your .htaccess file as soon as you customize your permalinks (and it updates automatically as soon as you change their structure).
- Certain types of plugins, especially those dedicated to security and caching, use the WordPress .htaccess file to add their own configuration rules.
An example of a .htaccess file on WordPress
To give you the clearest possible idea of what this distinctive file looks like, here is an example of a .htaccess file for a basic WordPress installation:
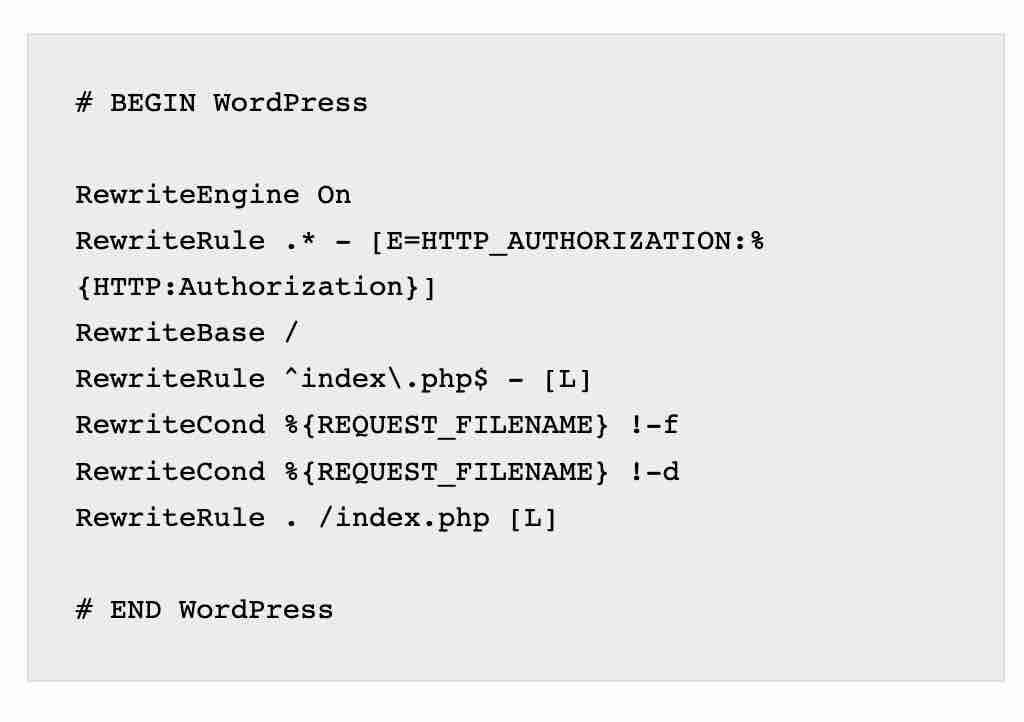
The screenshot above may seem abstract to you, even incomprehensible. Let’s break it down to make it clearer:
- Lines preceded by a hash sign (#) are comment lines (e.g.: # BEGIN WordPress and # END WordPress). Each comment must begin with a hash sign and is not treated as a directive.
- Between the two comment lines, you will find a piece of code that tells your server which rule to follow. Each directive applies to a given directory and its subdirectories. It is therefore possible to have several .htaccess files on WordPress, in different directories such as wp-content, wp-admin or wp-includes.
- The initials of the letters in square brackets (e.g.: ) correspond to instructions given to the server.
Each line of code necessarily has a meaning and its own syntax that Apache can understand.
For example, “f” denotes a file and “d” a directory. The exclamation mark indicates a negation: the files concerned should not follow the stated directive.
The idea here is not to confuse you with complex code and technical details. Nevertheless, if you want to dig deeper into the subject and better understand how to declare directives, consult the official Apache documentation.
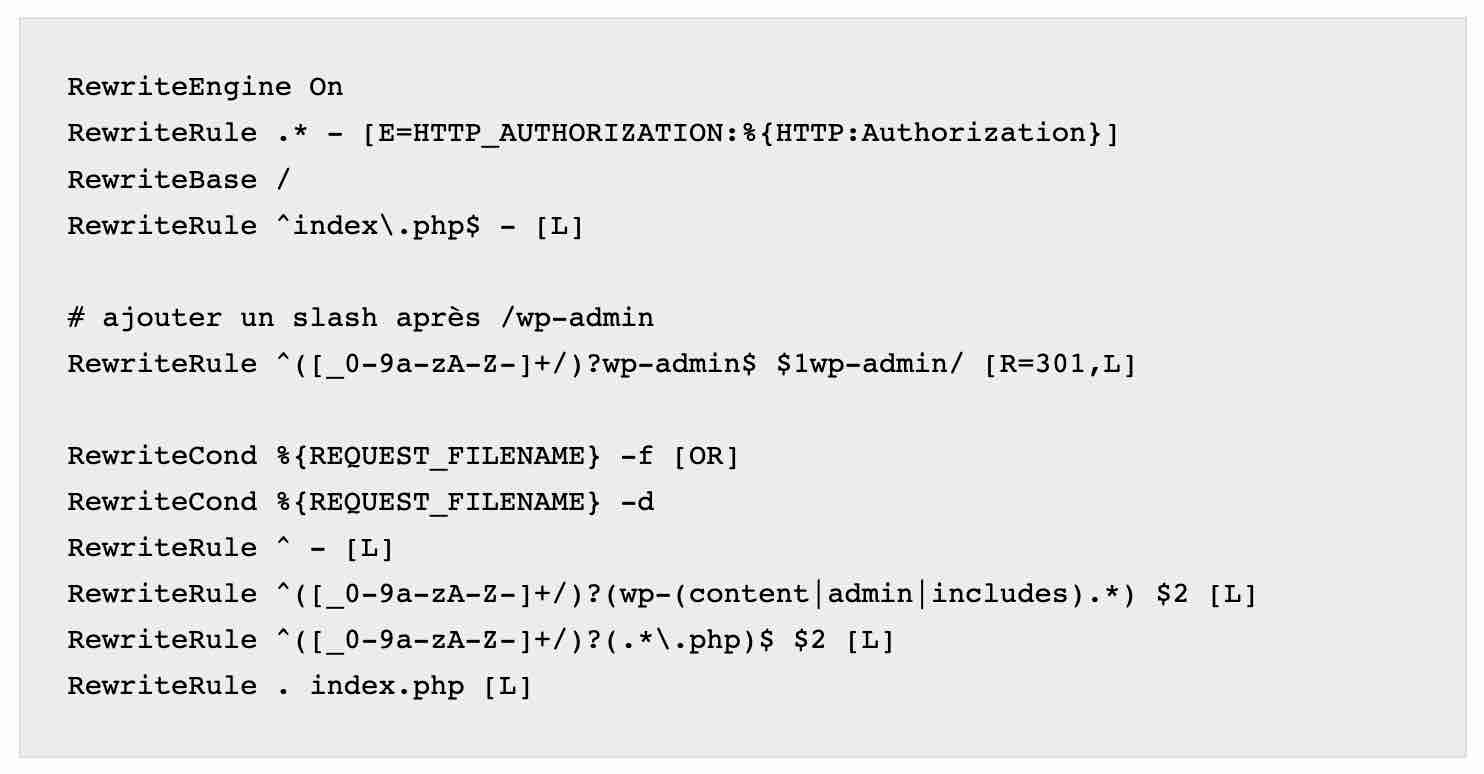
If you have enabled multisite on your WordPress installation, the generated .htaccess files will be different compared with a single-site installation. Here is an example for a multisite installation in a subdirectory:
What can you do with a .htaccess file?
As you have just seen, one of the advantages of the .htaccess file in WordPress is that it can be edited and customized as much as you like.
You can therefore add the directives of your choice to it, in the form of code snippets. These tell your web server how to behave and allow the following actions to be carried out, in three broad categories (security, redirects, and performance):
- Set up redirects, whether temporary (302 redirects) or permanent (301 redirects). You can use the .htaccess file in WordPress to redirect your site from HTTP to HTTPS, for example.
- Block access to your website for certain IP addresses, or make certain files inaccessible.
- Rewrite URLs to make it easier for search engines like Google to crawl and index your site.
- Increase the maximum file upload size allowed by WordPress.
- Customize the content displayed on your 404 error pages.
- Password-protect certain directories.
- Enable hotlinking protection. This technique consists of using the URL of a photo hosted on your site on another site, without hosting the photo on a server, in order to save bandwidth.
To start setting up the various rules of your choice, there is one prerequisite: locating your .htaccess file in WordPress. Detailed explanations in the next section.
Where is the .htaccess file located in WordPress?
As a general rule, WordPress creates a .htaccess file when you install the CMS on your hosting server.
You will find this .htaccess file in the root folder of your site.
The root is the base folder of your website’s file tree. The one that contains all your directories and files.
It has a different name depending on the hosting provider you use, as in the examples below:
- At OVH, it is called www.
- At Kinsta, the web host we recommend, it is called public.
- At o2switch, it is called public_html.
Please note that you may also find .htaccess files inside other directories on your site, and not only at the root.
To access your WordPress site’s root folder, you can either use an FTP client (File Transfer Protocol) or the interface provided by your web host (e.g.: cPanel).
In the screenshot below, taken from the FTP client called FileZilla, you can see the presence of a .htaccess file:
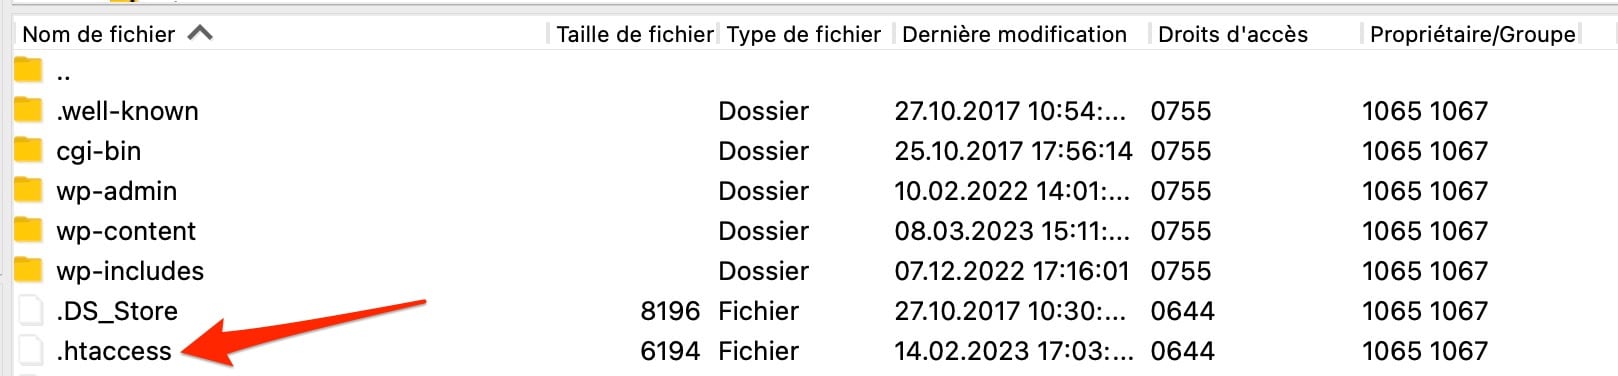
Once identified, you can edit your .htaccess. In the next section, you’ll discover 3 methods to do so.
How to modify a .htaccess file in WordPress?
Prerequisites
Before taking the plunge, it is important to follow certain best practices. Since the WordPress .htaccess file is very powerful, you must handle it with care.
For example, the slightest syntax error in the code will crash your site, displaying a lovely 500 error.
To avoid this mishap, here are a few tips to apply:
- Back up your site (files + database) before configuring your .htaccess file. To do this, use a plugin like UpdraftPlus or a maintenance tool like WP Umbrella.
- Copy your site’s current .htaccess file wherever you like (e.g.: to your Desktop) before handling it. If there is a problem, you will be able to restore it very quickly.
- Do not run your tests on a live website. If possible, work on a test environment first. Either on a local installation using a free tool DevKinsta or Local, or on a pre-production environment. If all your directives apply correctly, you can then upload your .htaccess file online with complete peace of mind.
- Get a text editor such as Brackets or Sublime Text. You will use it to edit the .htaccess file.
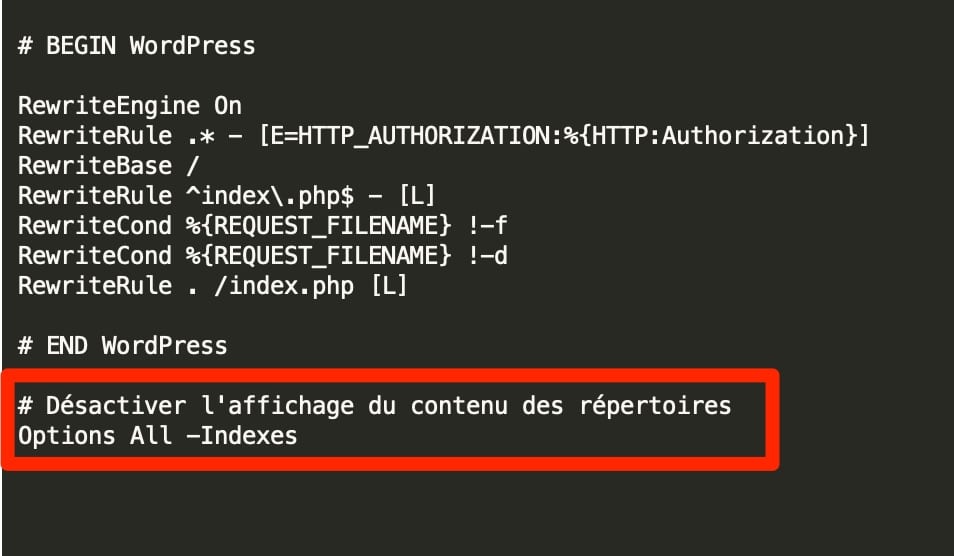
- Add your directives after the comment line # END WordPress, because the CMS may modify the code generated just above.
Method 1: use cPanel
A first way to access your .htaccess file on WordPress is to go through the interface provided by your web host.
cPanel is one of the most popular, which is why we’ll focus on it to begin with. To follow the procedure, complete the steps below:
- Log in to your cPanel using the credentials provided by your web host. In principle, you received them by email after subscribing to its hosting plan.
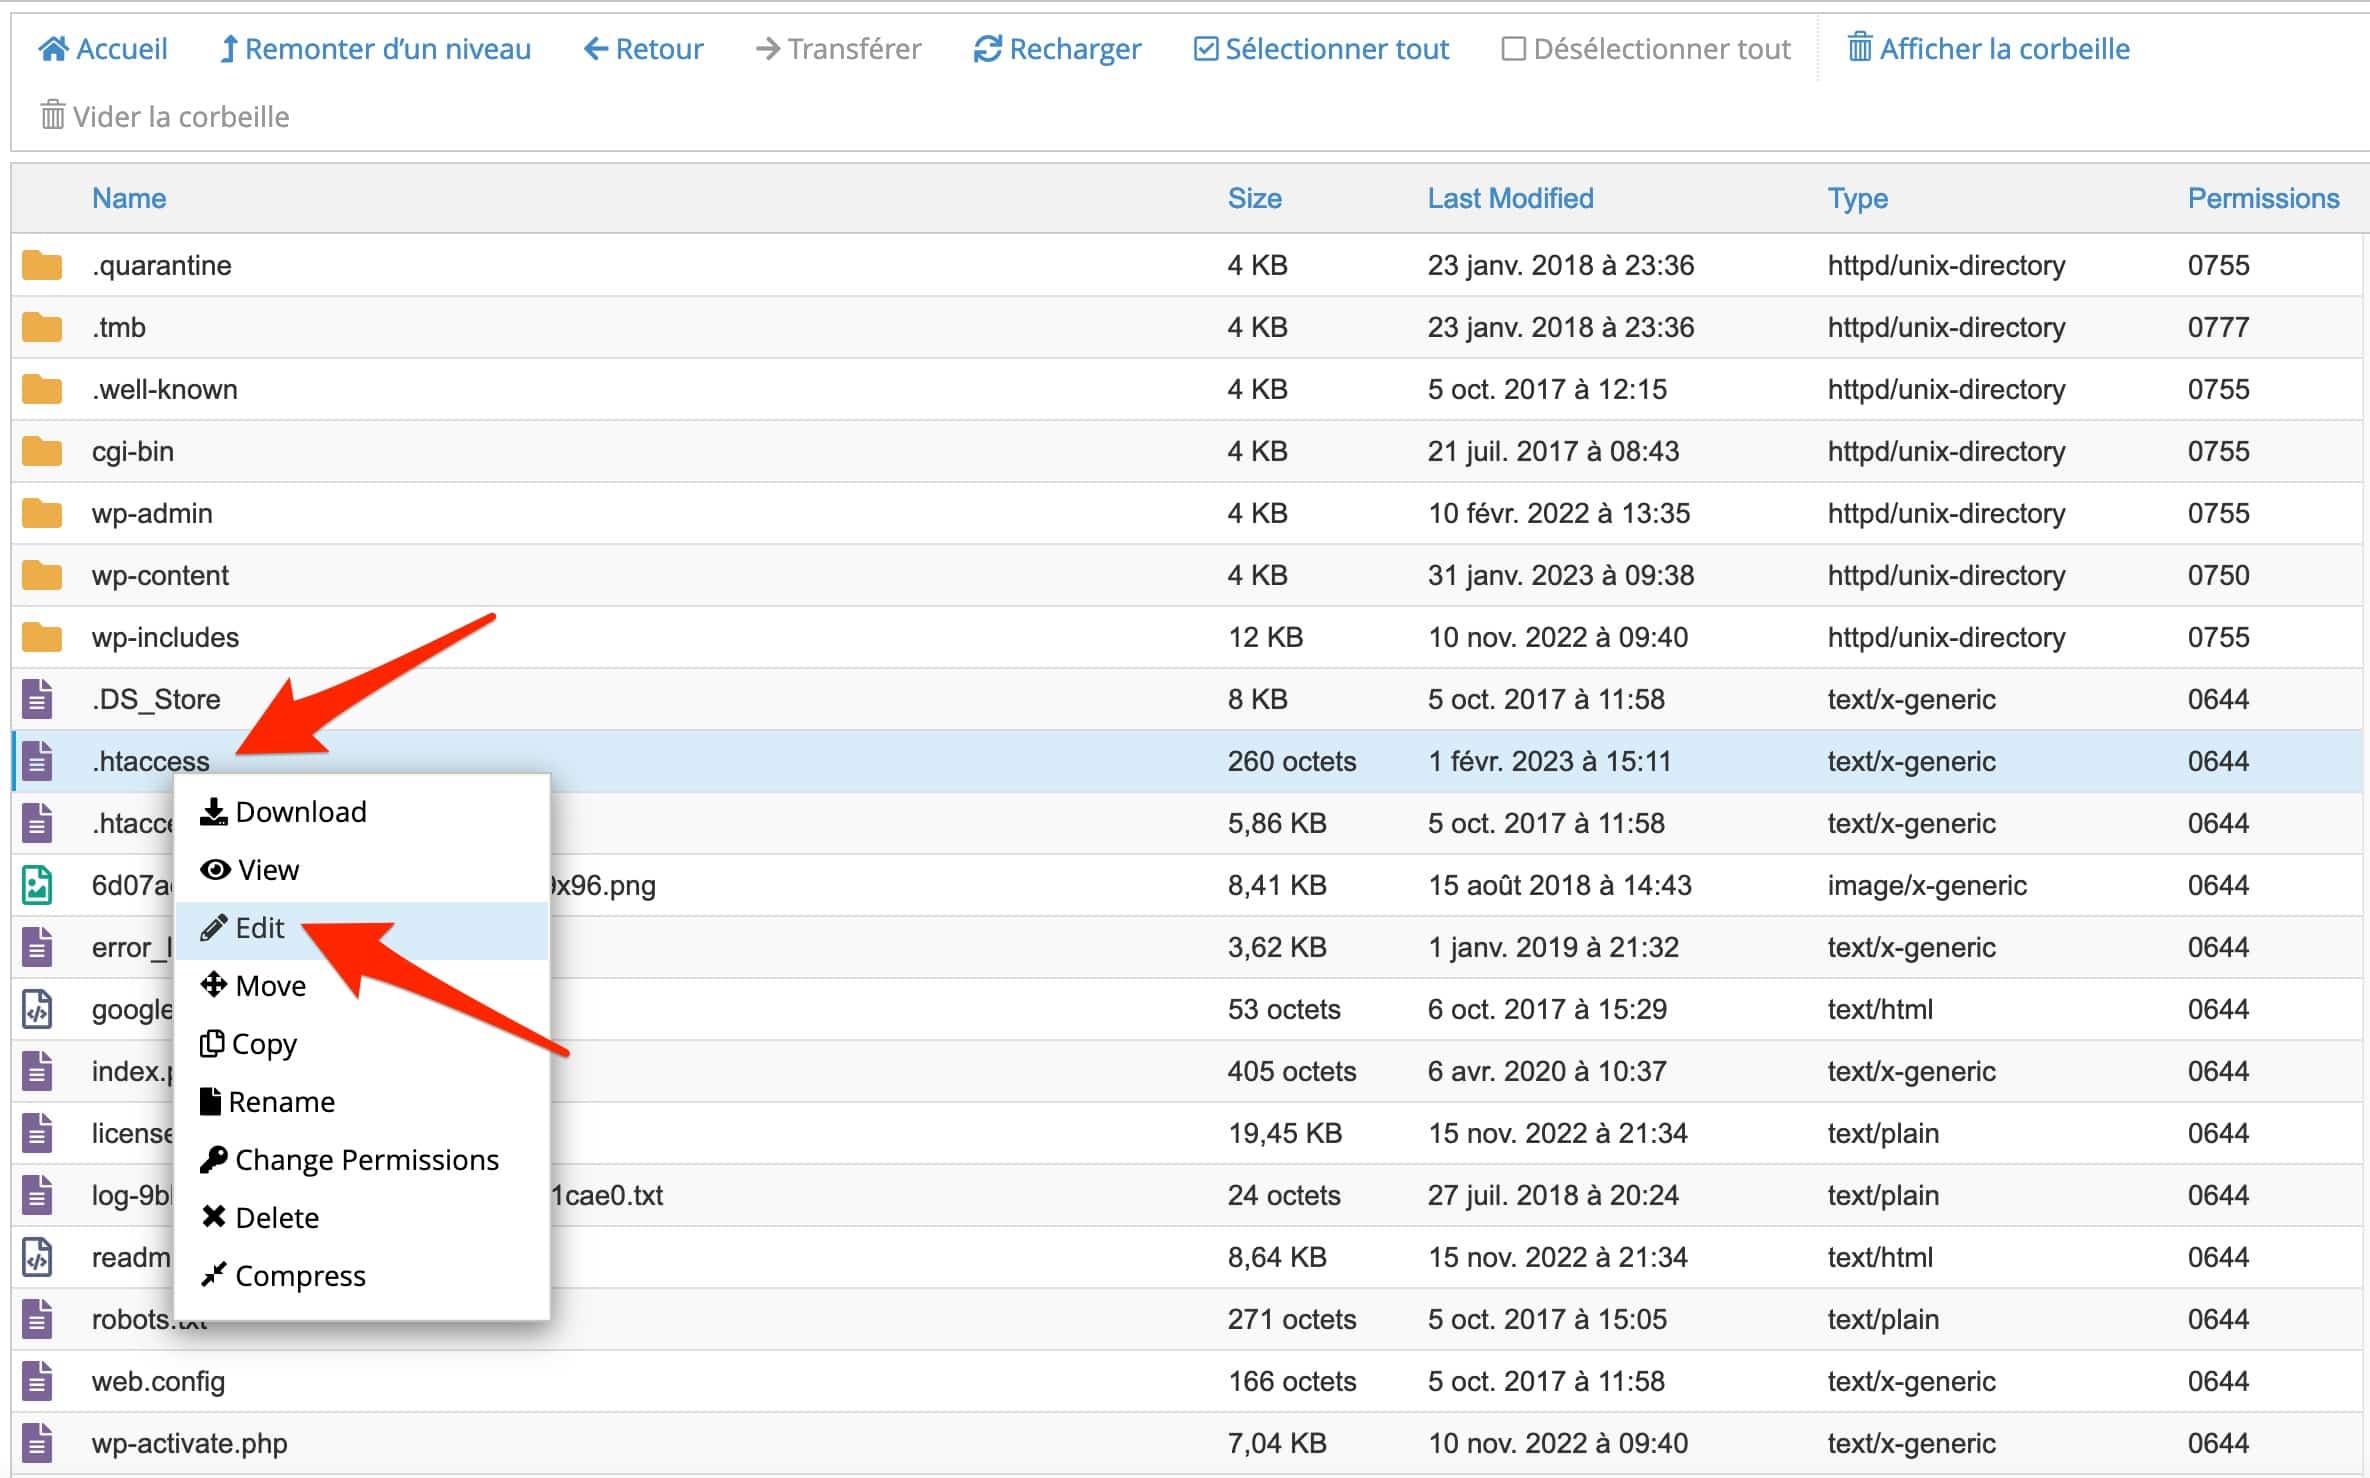
- In the “Files” section, click “File Manager.” Locate your root folder and double-click it.
- Find your .htaccess file in the list. To edit it, right-click and click “Edit”. A little more patience for the directives to add—we’ll devote an entire section to that a bit later.
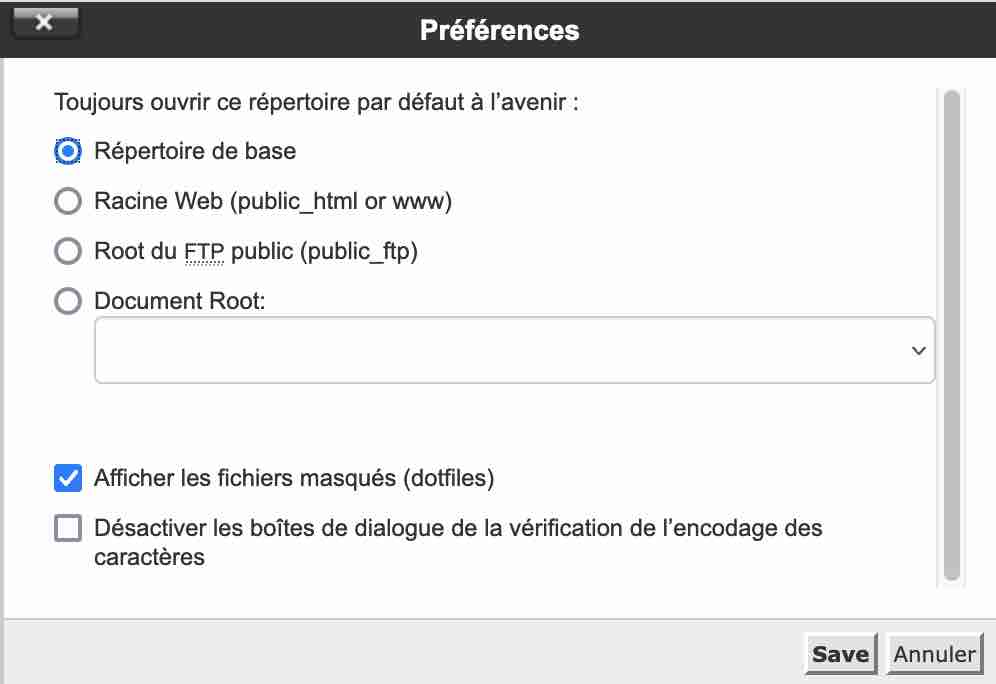
Your .htaccess may not be visible. Don’t panic, remember: it is often a hidden file. You can still display it by clicking the “Settings” button at the top right of your page. In the highlighted window that opens, click “Show Hidden Files (dotfiles).” Your .htaccess should normally appear.
Method 2: use an FTP client
Does your web host not offer cPanel? Or do you not want to use this method?
A second way to modify your .htaccess file is to use an FTP client.
We briefly talked about it a little earlier; here is the technical method so you can manage it on your own:
- Log in to your favorite FTP client (Filezilla, Cyberduck, Transmit, etc.) using the credentials provided by your web host. You need 4 pieces of information: the connection host, the port, a username, and a password.
- Go to the root of your site and double-click it.
- Look for your .htaccess file. Once you have found it, click on it to highlight it, then right-click. Select View / Edit to open it.

Method 3: using a dedicated plugin
Finally, accessing and modifying your .htaccess file on WordPress is possible by using a plugin. The advantage here is that you do not leave your WordPress dashboard to make your changes.
Several solutions are available to you for this:
- Opt for a specific plugin, such as Htaccess File Editor.
- Take advantage of an option offered by your SEO plugin. Yoast SEO, Rank Math, or SEOPress Pro, for example, allow you to edit your .htaccess file.
The steps to follow with the Htaccess File Editor plugin are as follows:
- Install and activate the plugin via the Plugins > Add New menu.
- Go to the Settings > WP Htaccess Editor menu.
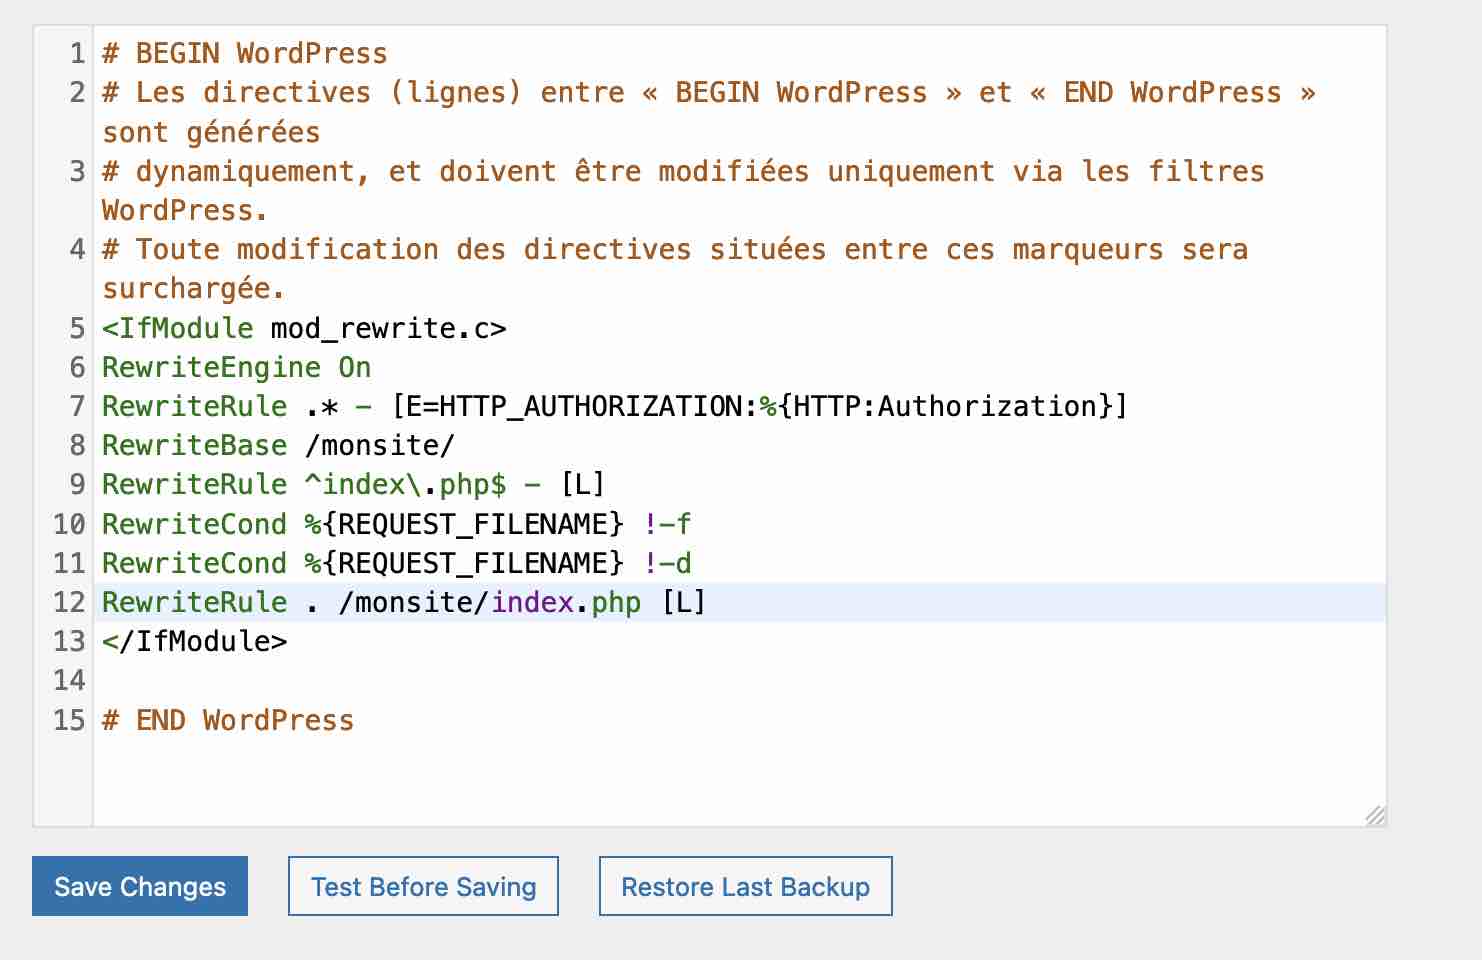
- Enter your configuration rules. You can test them before saving to avoid any problems (SEOPress Pro also allows this) by clicking the “Test Before Saving” button. If everything works, finish by saving your changes (“Save Changes” button).
You now know several methods for finding and editing your .htaccess file on WordPress.
In some rarer cases, you may not have a .htaccess file (even if you force hidden files to be displayed, as we have seen).
If you are facing this situation, you will need to create your .htaccess file from scratch.
How do you create a .htaccess file?
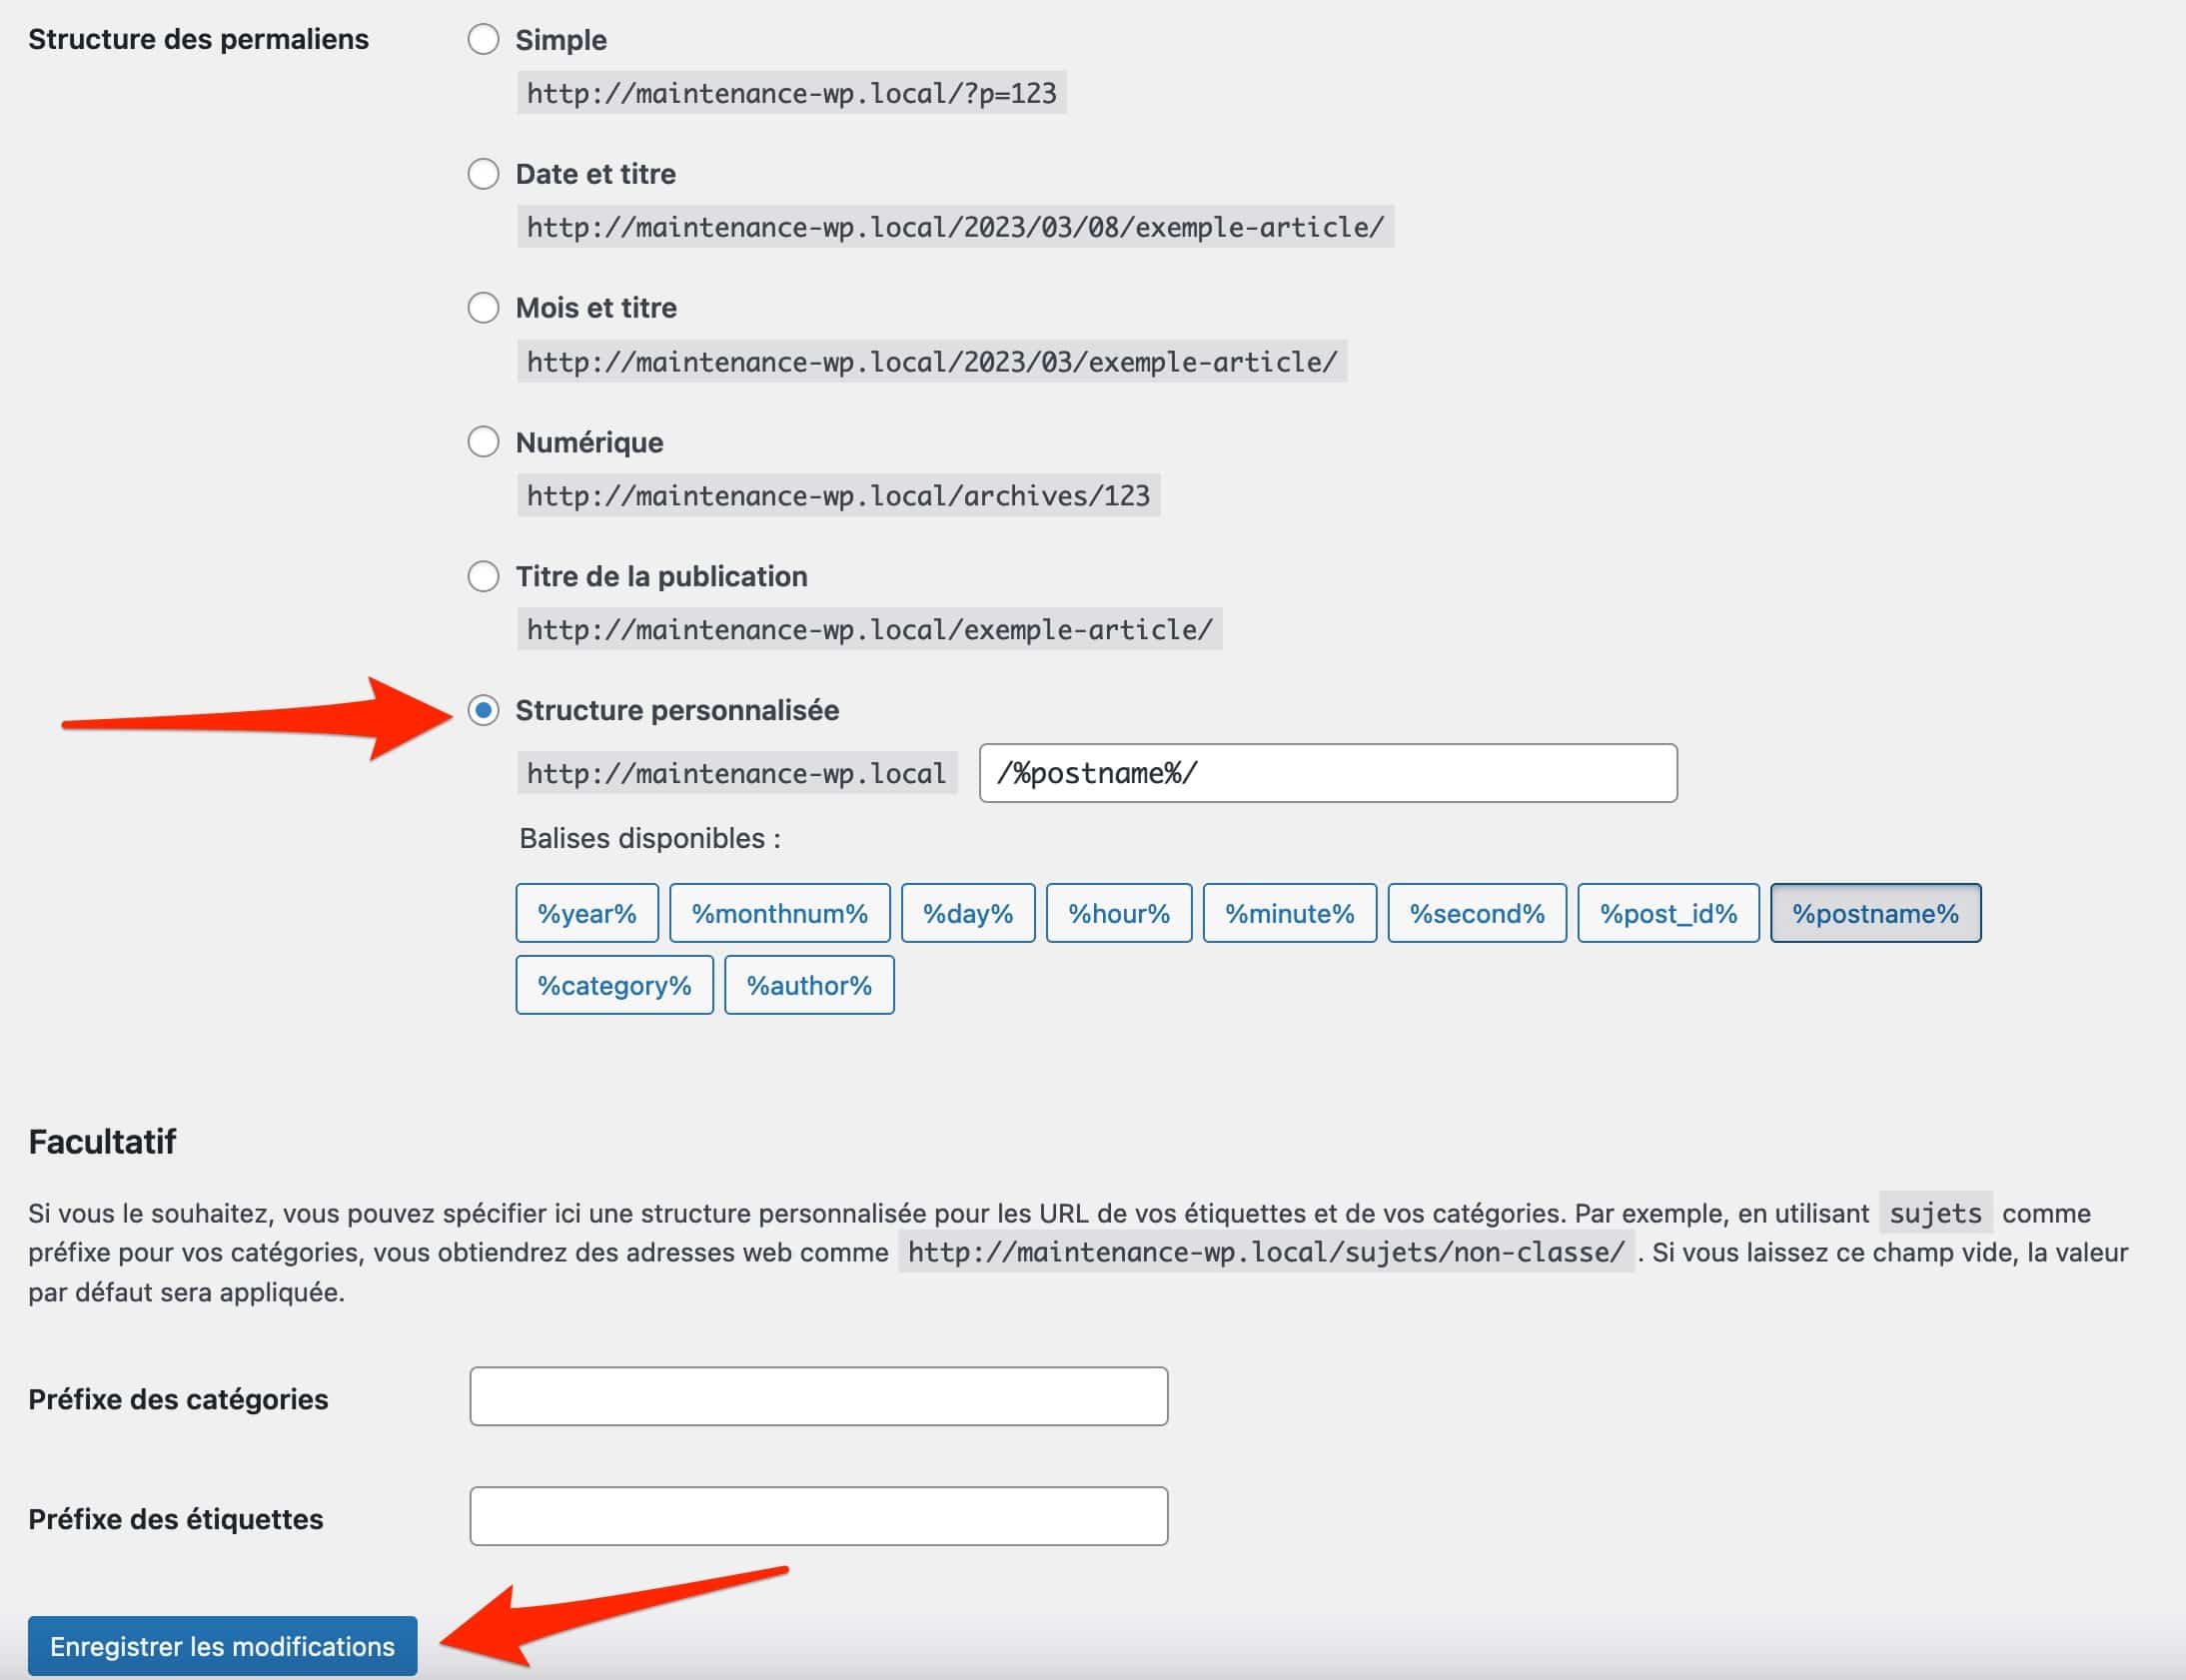
To create a new .htaccess file, start by regenerating your permalinks.
To do this, in your WordPress back office (admin interface), go to Settings > Permalinks. Then save your permalinks by clicking the “Save Changes” button:
Go back to your FTP client or cPanel interface and check whether the .htaccess file has appeared (don’t forget to force hidden files to be displayed if you can’t see it).
Still can’t find it? It’s time to create your .htaccess from scratch.
Once again, back up your website (files + database) before you start and run your tests on a test environment, specifically (not directly in production).
To do this, follow these steps:
- Log in to your FTP client.
- In your site’s root folder, right-click and select “Create a new file”. Name it .htaccess.
- Open this file with your code editor and add the configuration rules found in a basic WordPress installation:
# BEGIN WordPress
RewriteEngine On
RewriteRule .* -
RewriteBase /
RewriteRule ^index\.php$ -
RewriteCond %{REQUEST_FILENAME} !-f
RewriteCond %{REQUEST_FILENAME} !-d
RewriteRule . /index.php
# END WordPress
If an error appears on your screen, delete all the additions you made and save again. In principle, everything should return to normal.
In principle, how the .htaccess file works should no longer hold any real secrets for you. To finish, you’ll see how to configure it as you wish by adding the directives of your choice.
How to configure the WordPress .htaccess file: 13 rules to optimize it
Before you start editing your .htaccess file, here’s one last reminder of a few basic rules (you can never have too many):
- Back up your site before making any changes to your .htaccess file.
- Copy the contents of your current .htaccess file into a text file on your computer.
- Add your configuration rules below the directives already present in your current file.
.htaccess rules on WordPress related to security
Prevent access to .htaccess
Thanks to the code snippet below, you will strengthen the security of your WordPress .htaccess file.
Anyone trying to access it will be shown a 403 error:
# Secure the .htaccess file

Order allow,deny
Deny from all
Prevent access to a specific file
You can restrict access to a specific file with this directive. Replace the file name shown in the snippet (yourfile.jpg) with the file name and extension of your choice.
# Restrict access to a file

Order allow,deny
Deny from all
Restrict access to the wp-admin folder
To prevent someone from logging into your admin interface, create a new .htaccess file that you will add to the wp-admin directory of your WordPress website.
Then add the following directive to the .htaccess file (replace the Xs in the dummy IP address with the IP address authorized to connect to your site):
# Limit logins and admin by IP

order deny,allow
deny from all
allow from xx.xx.xx.xx
Block an IP address
If you are experiencing spam from a specific IP address, you can prevent it from accessing your site with this piece of code.
Replace the dummy IP address provided in the snippet with the one of your choice:
order allow,deny
deny from xxx.xxx.xx.x
allow from all
Disable directory content listing
By default, the directories (and their contents) of your WordPress site are accessible by typing a simple URL into your browser. This poses a significant security problem, because anyone can view and copy certain information from your site. Not to mention hack it.
To prevent this, copy and paste the following code into your .htaccess file:
# Disable directory content listing
Options All -Indexes
Block access to the wp-config.php file
# Protect the wp-config.php file

order allow,deny
deny from all
Prevent comment spam
Are you getting lots of spam comments promoting products and other dubious sites? Copy and paste this piece of code into your .htaccess file to get rid of them.
Replace votresite.com with your site name:
# Prevent comment spam

RewriteCond %{REQUEST_METHOD} POST
RewriteCond %{REQUEST_URI} .wp-comments-post\.php*
RewriteCond %{HTTP_REFERER} !.votresite.com.*
RewriteCond %{HTTP_USER_AGENT} ^$
RewriteRule (.*) ^http://%{REMOTE_ADDR}/$
A good tip for limiting spam is also — and above all — to activate a plugin like Akismet, which is included by default with every new WordPress installation.
Hide server-related information
With this directive, you will prevent certain pages from displaying information that could identify your server.
# Hide server-related information
ServerSignature Off
Directives for creating redirects
Create a 301 redirect
A permanent redirect (301 redirect) redirects URL A (e.g., mapage.fr) to URL B (tapage.fr).
# Redirect one page to another
Redirect 301 /mapage.html https://www.yourwebsite.com/nouvellepage.html
To create redirects, you can also use the plugin of the same name: Redirection.
Redirect a www domain to a non-www domain
Use this code to redirect a www site (e.g.: www.maintenancewp.fr) to a site without www (e.g.: maintenancewp.fr).
Replace supersite.com with the domain name of your choice:
# Redirect to a domain name without www
RewriteEngine on
RewriteCond %{HTTP_HOST} ^www\.supersite\.com
RewriteRule ^(.*)$ http://supersite.com/$1
Redirect a non-www domain to a domain with www
Conversely, it is possible to redirect a domain name without www to a domain name with www.
Always remember to replace supersite.com with your domain name:
# Redirect the site without www to www
RewriteEngine On
RewriteCond %{HTTP_HOST} ^supersite.com
RewriteRule ^(.*)$ http://www.supersite.com/$1
Redirect to HTTPS
The following directive will force your visitors to browse the HTTPS version of your site.
Beforehand, you must have enabled an SSL certificate, most often offered free of charge by your hosting provider:
RewriteEngine On
RewriteCond %{HTTPS} off
RewriteRule (.*) https://%{HTTP_HOST}%{REQUEST_URI}
Rules to improve performance
Prevent hotlinking of your images
When you are a victim of hotlinking, a malicious person copies the URL of an image from your site to display it on their own without having to upload the image to their Media Library (among other things).
Problem? To display this image, your hosting server is called upon. As a result, you use more bandwidth, which can slow down the loading speed of the pages on your site or sites.
To avoid this inconvenience, enter this code in your .htaccess file (replace votresite.com with your domain name):
# Prevent hotlinking of your images
RewriteEngine on
RewriteCond %{HTTP_REFERER} !^$
RewriteCond %{HTTP_REFERER} !^http(s)?://(www\.)?votresite.com
RewriteRule \.(jpg|jpeg|png|gif)$ -
To go further and discover other directives, we recommend the following resources and sites:
- The official WordPress documentation.
- The resource Stupid .htaccess Tricks by American developer Jeff Starr, a WordPress and .htaccess file specialist.
- The site .htaccess Generator, to automatically generate directives for your .htaccess file.
Summary
Used correctly, the WordPress .htaccess file is a very powerful tool for strengthening security, creating redirects, or even improving your site’s performance.
Throughout this article, you have discovered the following elements:
- What a .htaccess file is and what it is used for.
- How to locate this file and modify it.
- How to create a .htaccess from scratch.
- Best practices for handling the .htaccess file.
- Rules for configuring additional features on your server.
In WordPress, configuring a .htaccess file is not without risks. You need to pay attention to the syntax, and above all protect yourself by taking the usual precautions before taking action (e.g., backing up your site).
Despite all that, is an error displayed after editing your file on your end? Or would you simply like guidance in configuring this key file?
Fast, professional, and efficient, the Maintenance WP team of experts is available 7 days a week to provide you with tailored support. Contact us to learn more.